Required air supply
| Parameter | Setting |
|---|---|
| Operating pressure | 50 PSI at the machine inlet |
| Minimum safe pressure | Keep at 50 PSI — do not run below it |
| Regulator | Compressor side, set to 50 PSI |
| Ball valve | Closed before starting compressor, then open during operation, closed at shutdown |
| Hose connection | Quick-disconnect on the T-1000 rear panel |
Compressor startup sequence
- Drain the tank — open the compressor drain valve until water stops flowing, then close it
- Close the ball valve — make sure the ball valve on the compressor outlet is closed before starting the compressor
- Connect the air hose — attach to the T-1000 quick-disconnect on the rear panel; listen for the coupling to seat. Do this before starting the compressor while it is easier to connect
- Start the compressor — with the ball valve still closed, start the compressor and let it build pressure
- Open the ball valve — once the compressor has built pressure, open the ball valve on the compressor outlet
- Set the regulator — adjust to 50 PSI at the compressor side
- Verify pressure — check the T-1000 gauge reads 50 PSI before starting production
- Check the water separator / air catch — drain any accumulated moisture from the filter bowl or air catch
Daily compressor checks
| Check | Frequency |
|---|---|
| Drain water from the compressor tank | Start of every shift |
| Verify regulator reads 50 PSI | Every startup |
| Inspect air hose for cracks or loose fittings | Daily |
| Drain the water separator bowl | Daily, or when moisture is visible |
| Run a test seal and inspect quality | Every startup |
Summer water buildup & clogged drain
In warm, humid weather (worst in summer) the tank collects water fast, and debris + sludge can clog the drain valve so it stops draining even with water still inside. This is a known issue on this compressor — here is the recovery that works:
- Close the drain valve so the tank can re-pressurize
- Close the ball valve to the machine (keep the air out of the line while you work on the drain)
- Turn the compressor ON and let it build up pressure with the vent/drain still closed
- Open the drain valve once pressure is up — the stored pressure blows the water and debris out in a rush and clears the clog
- Repeat if the first blast doesn't fully clear it; then close the drain valve and return to the normal startup sequence
If pressure-blowout stops working (the clog returns sooner each time), the tank sludge has built up past what flushing clears — the drain valve or petcock needs to be removed and cleaned, or the tank professionally flushed.
Production
Production
Run the bagger safely and consistently: verify settings, check the first bag, monitor quality, and complete a clean film changeover when needed.
From startup to your first cycle
Follow these screens on our bagger. Complete the machine startup checklist, including the air-pressure and guard checks, before enabling a cycle. Use the approved job settings; the values pictured are examples. Select any image to enlarge it.
-
1. Startup → Operation
After the machine powers on, the Startup screen appears. Select Operation to open the local operation screen shown in the next step.
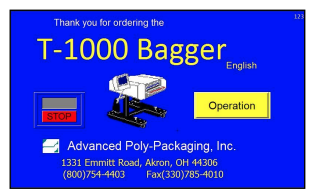
Startup screen — select Operation. -
2. Operation → Main Menu
On the local Operation screen, select Main Menu in the bottom-right corner.
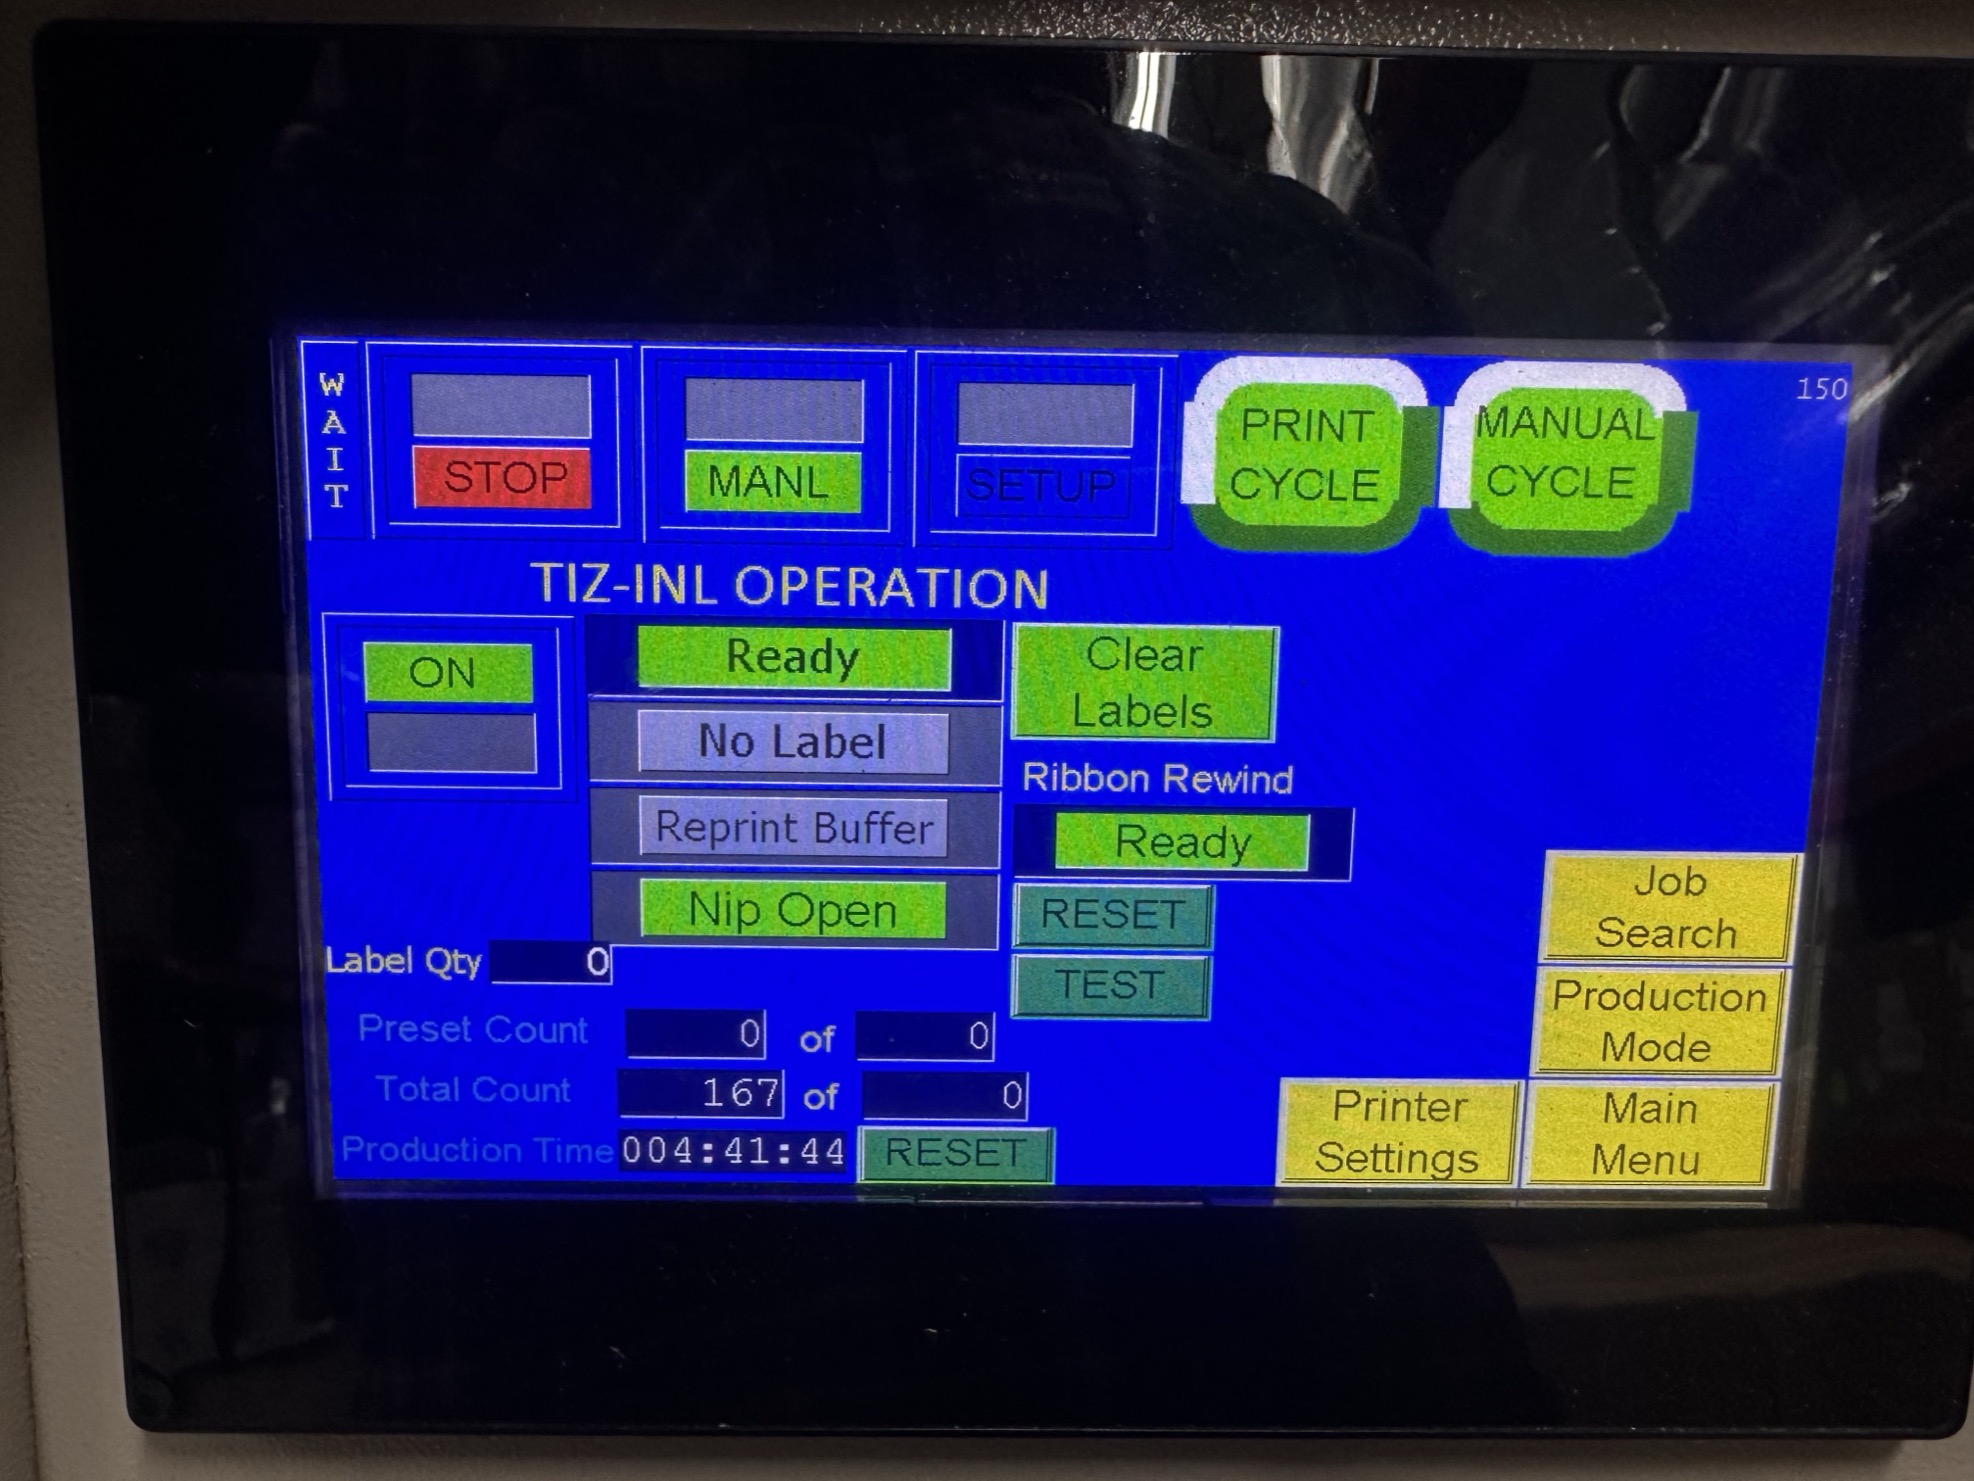
Local Operation — Main Menu is at the bottom right. -
3. Main Menu → Bagger Settings
On the local Main Menu, select Bagger Settings, the middle button in the top row of yellow menu buttons.
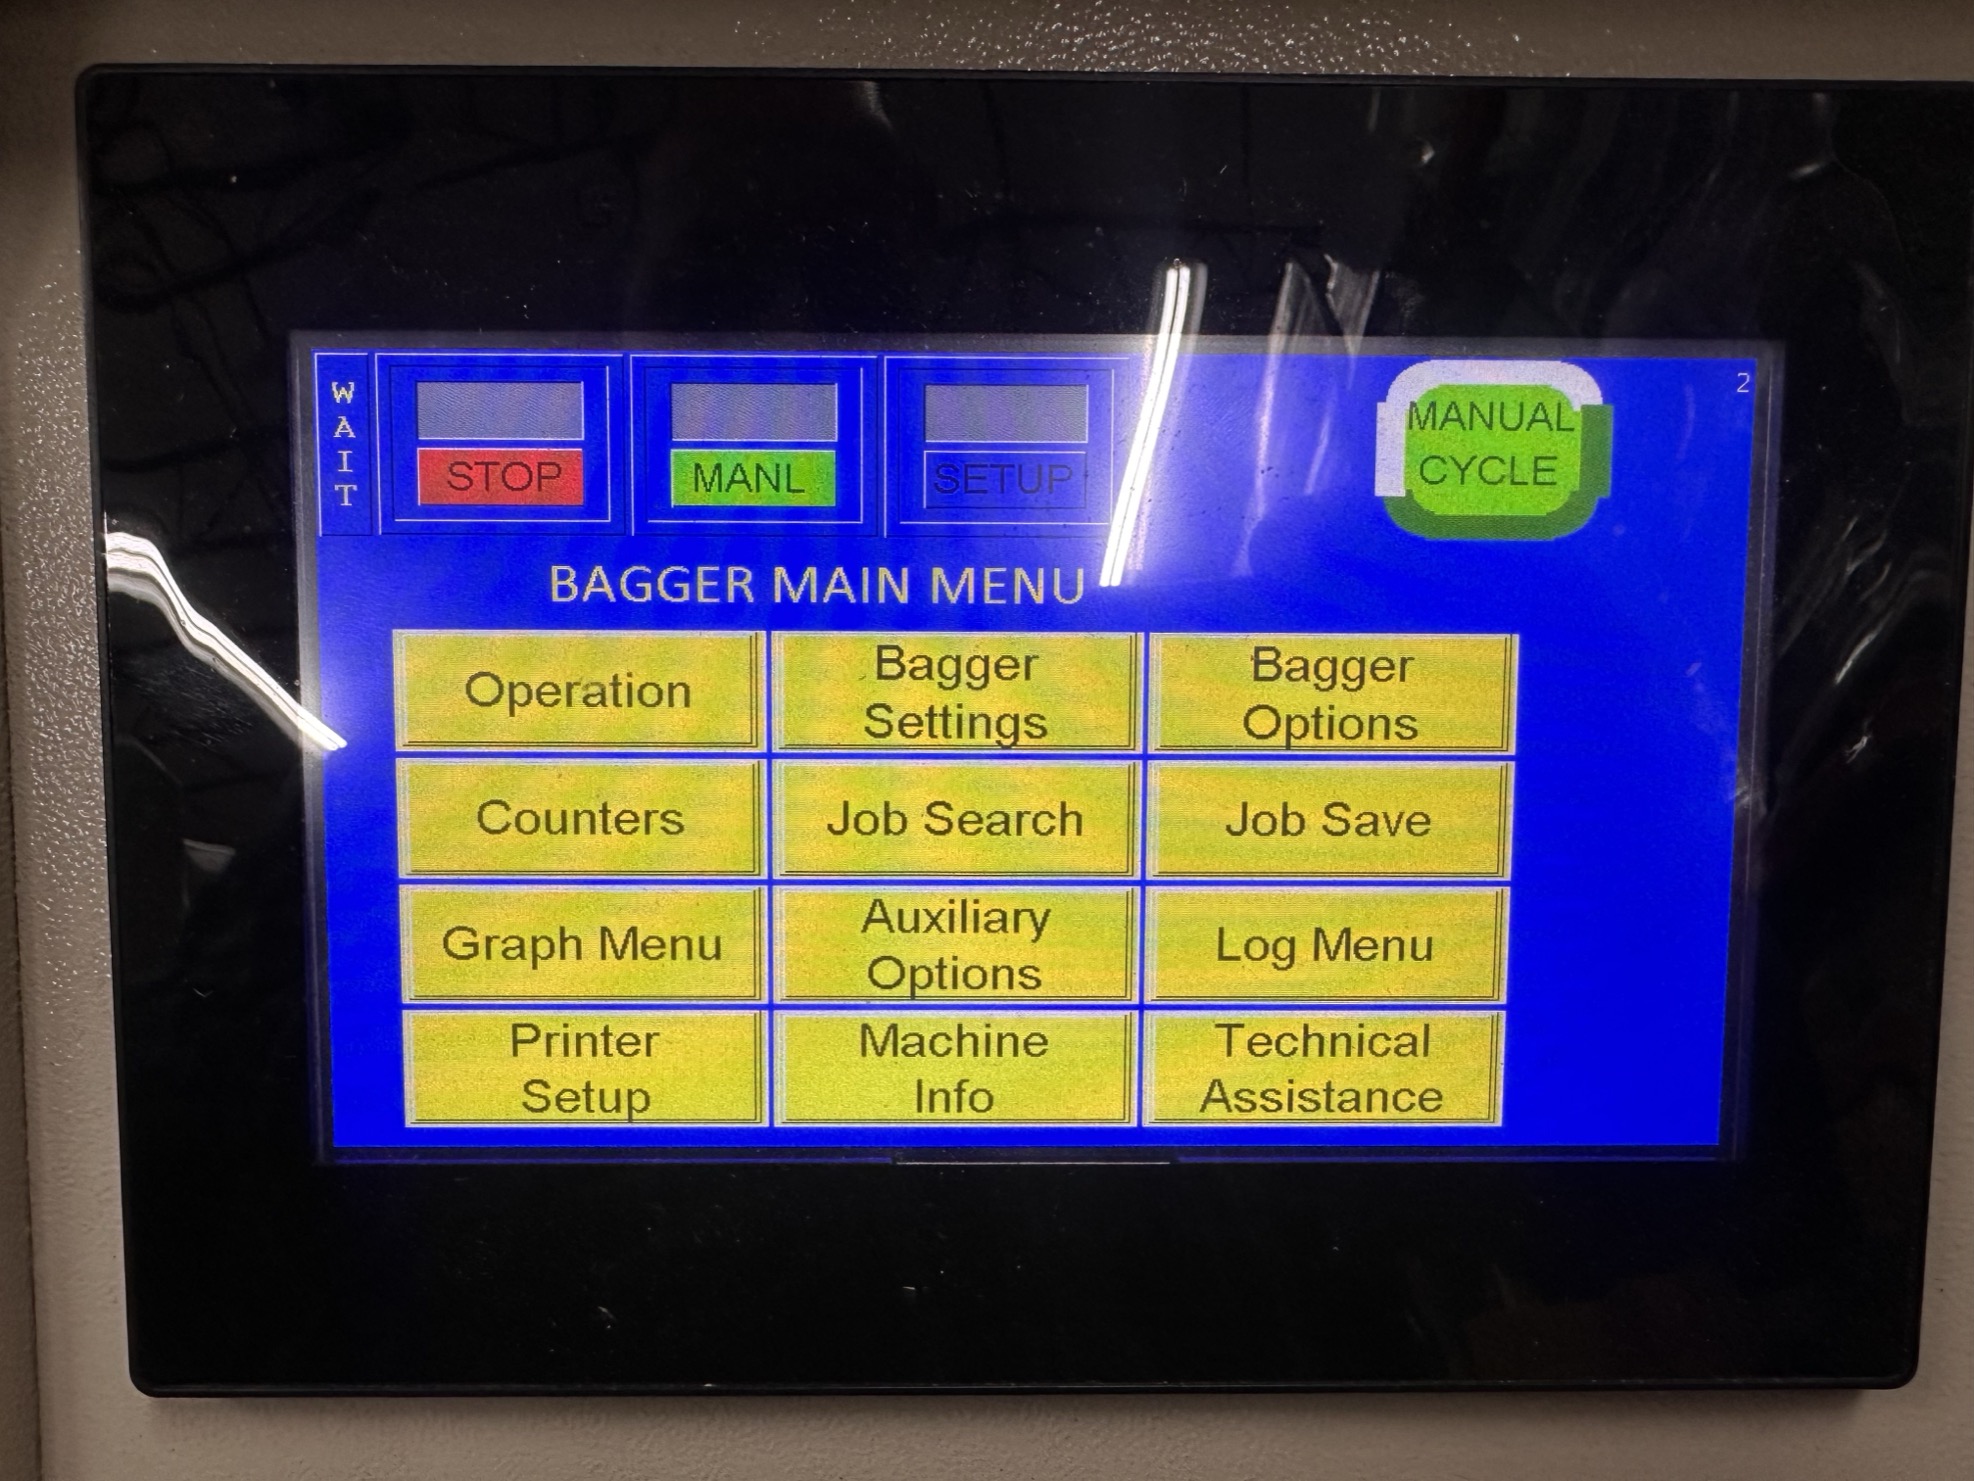
Local Main Menu — select Bagger Settings. -
4. Bagger Settings — wait for Ready
The local Bagger Settings screen opens. Confirm the approved settings, then halt here until Wait changes to Ready. The bagger indicator is at the upper left, beside Stop. Do not confuse it with the printer’s separate Ready indicator on the Operation screen.
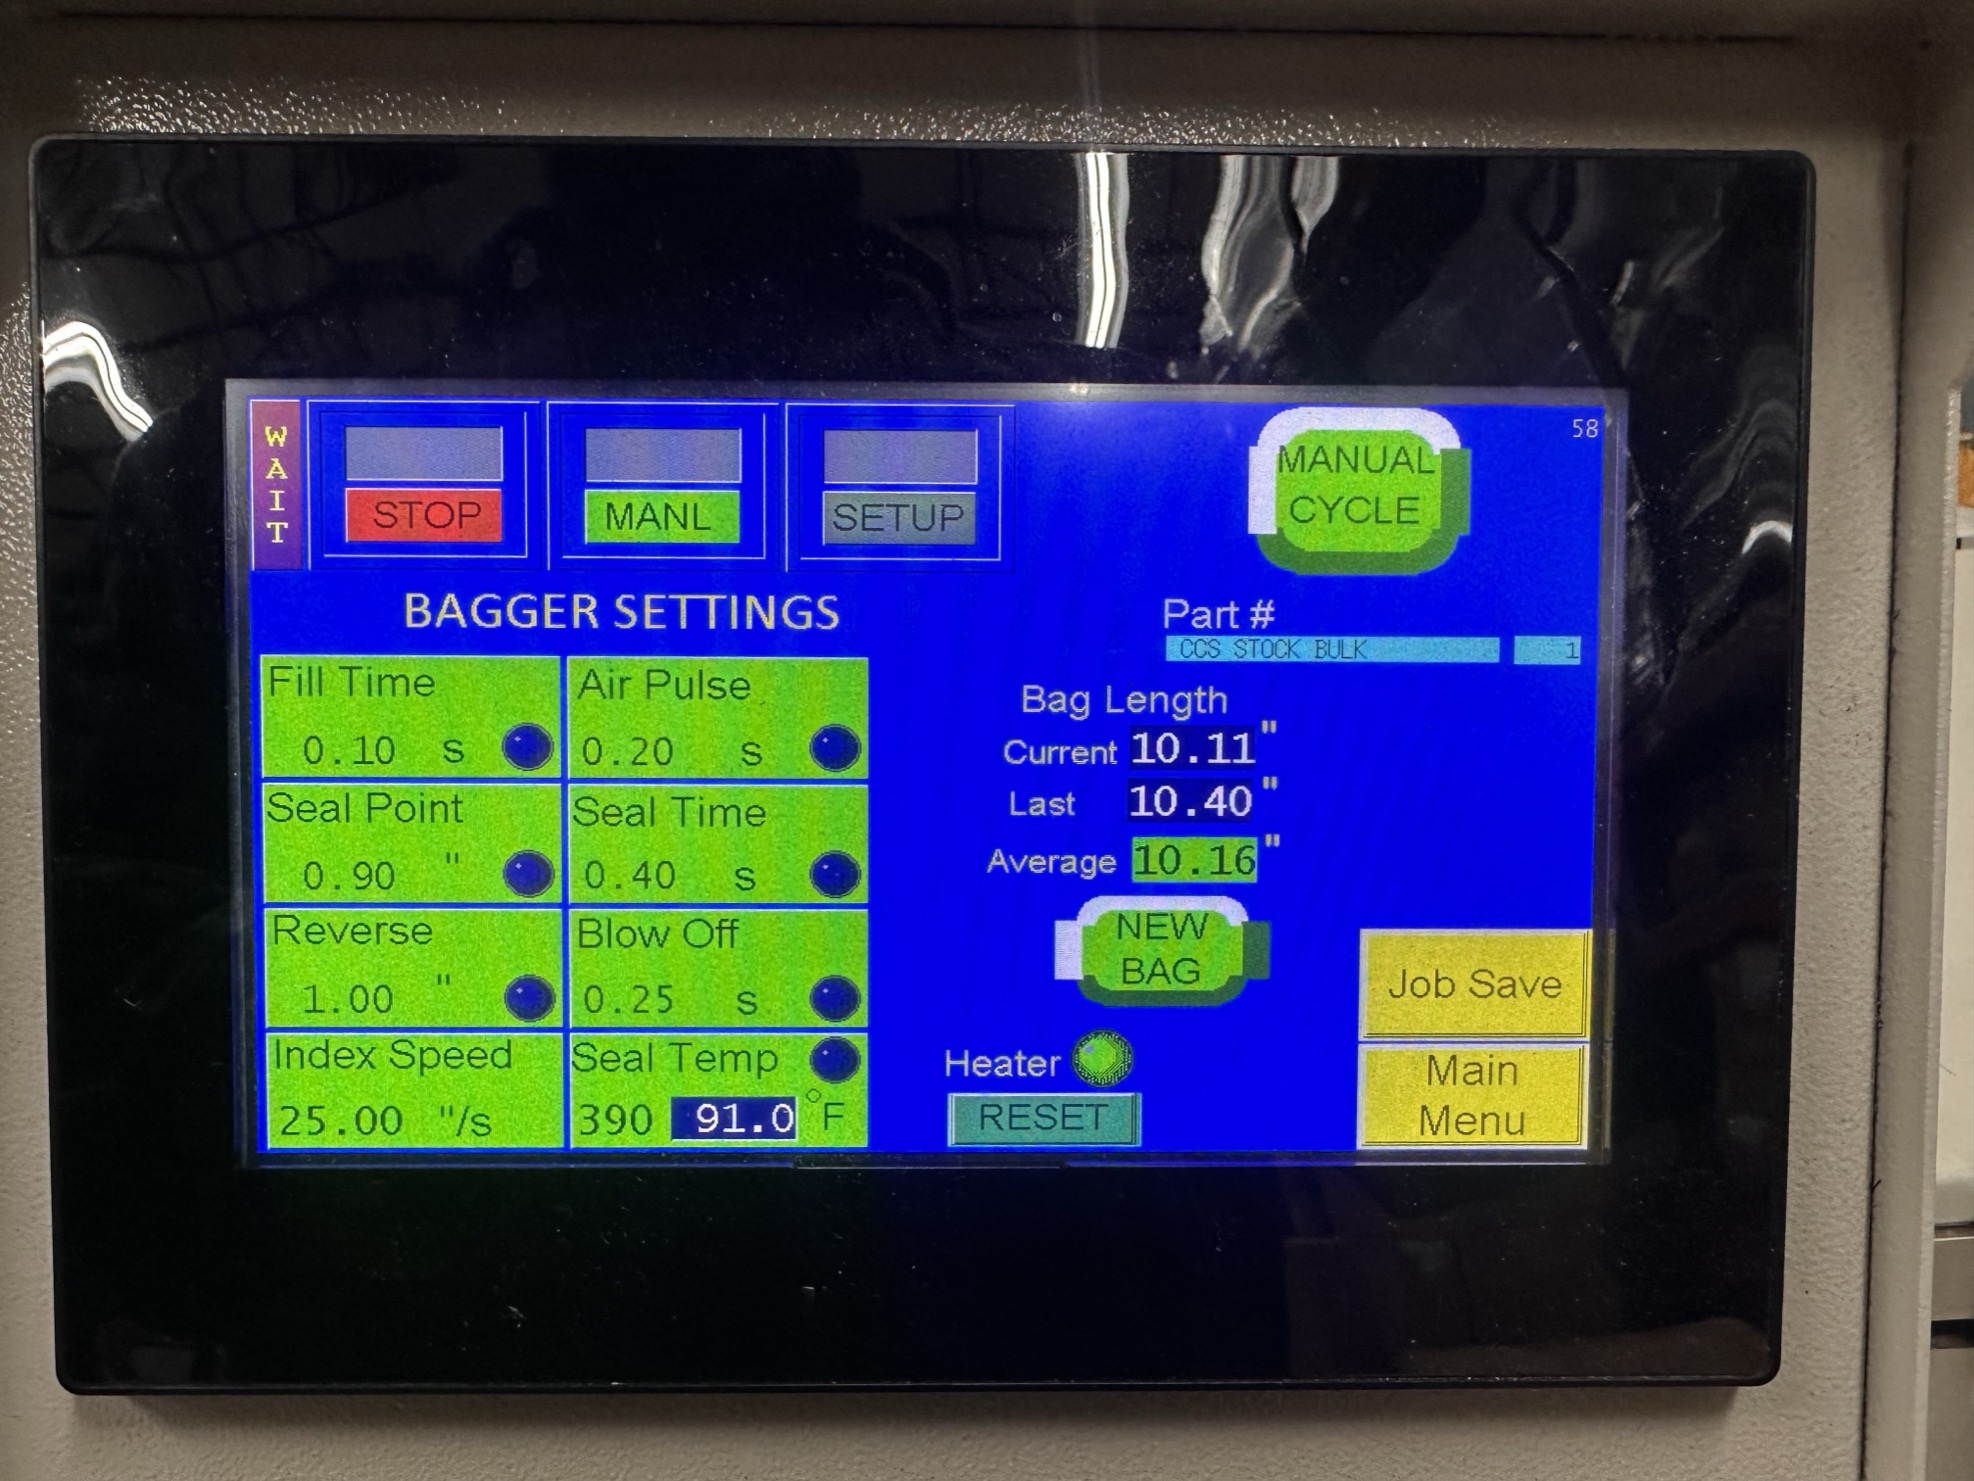
Local Bagger Settings — this photo still shows Wait. -
5. Select Stop to enable the machine
Once the bagger shows Ready, select the red Stop button immediately to the right of the Ready/Wait indicator. This toggles the machine from Stop to Start, enabling it to cycle.
-
6. Press Manual Cycle to engage
With the operating area clear, press the green Manual Cycle button at the upper right to engage one cycle. Check the first bag’s seal and length before continuing production.
Manufacturer control reference — Operation, Main Menu, Start/Stop, Ready/Waiting, and Bagger Settings (printed page 28).
Change bag & film roll
When to change the film roll
- Film core becomes visible on the unwind spindle
- Switching to a different film width or gauge
- Film is creased, torn, or misfeeding
- Seal quality degrades on a nearly-empty roll
Changeover steps
- Stop the machine — complete the pending cycle, then press E-stop
- Open the film guard — release the latch and lift the guard
- Remove the empty core — slide it off the unwind spindle and discard
- Load the new roll — slide it onto the unwind spindle, matching the film direction shown in the threading diagram inside the guard
- Thread the film — route film through the rollers exactly per the diagram; keep tension even and avoid wrinkles
- Close the film guard — ensure it seats fully before running
- Test cycle — run one test bag, verify seal quality and bag length, then resume production
After every changeover
- Re-bag any products bagged during the transition (see Rebagging procedure)
- Confirm the label prints upright and on-center on the first new bag
- Log the roll change and film type in the production log
Weekly deeper closeout
- Inspect the film path for debris, dust, or stray film fragments
- Check the water separator filter for buildup and replace if needed
- Verify the compressor intake filter is clean
- Wipe down the control panel and counter display
Label printing
Mac setup & label printing workflow
One-time Mac configuration to connect the Zebra printer, plus the daily workflow for printing UPC barcode labels from .docx source files.
Printer connection (one-time Mac setup)
These steps only need to be done once per Mac workstation:
Connect the Zebra printer
Connect the Zebra ZTC 110Xi4-203dpi printer via USB-B to USB-A cable (or USB-C adapter). The port is on the back of the printer.
Create CUPS print queue
Register the printer queue on macOS:
Verify detection
Install dependencies
The Python label script requires Pillow for image processing:
-o raw, macOS converts the ZPL to a raster image, producing garbled output. Always pass -o raw when sending ZPL via lp. The one-step script handles this automatically.One-step label printing
From the poly-bagger/ directory, run print_label.py to extract the image, generate ZPL, and print in one command:
If the label prints upside down, add --rotate 180:
Script options
| Flag | Default | Description |
|---|---|---|
--scale | 4 | Scale factor: 3 (2.85"), 4 (3.80"), 5 (4.75") |
--rotate | 0 | Rotate image degrees (180 to fix upside down) |
--no-print | off | Generate ZPL only, don't send to printer |
Manual workflow
If you need to inspect or modify the intermediate files:
- Extract image from .docx:
python3 -c "..." - Rotate if needed:
python3 -c "Image.open(...).rotate(180).save(...)" - Generate ZPL: encode 1-bit image as
^GFAhex - Send to printer:
lp -d Zebra -o raw label.zpl - Verify queue:
lpq -P Zebra
Printer queue commands
| Command | Purpose |
|---|---|
lpq -P Zebra | Check print queue |
lpstat -p Zebra | Check printer status |
cancel -a Zebra | Cancel all queued jobs |
cupsenable Zebra | Re-enable printer (if disabled) |
Scale & label dimensions
| Scale | Image dots | Physical size | Label area |
|---|---|---|---|
| 3× | 579 × 150 | 2.85" × 0.74" | 699 × 230 |
| 4× | 772 × 200 | 3.80" × 0.99" | 892 × 280 |
| 5× | 965 × 250 | 4.75" × 1.23" | 1085 × 330 |
^PON or ^FWN in ZPL — these commands cause the printer to reject the job with a "not ready" error. Always rotate the image in Python instead.
Save & restore the label on the printer (survives power-off)
The label lives in the Zebra printer's flash memory, not the bagger. Save it once. After any power outage or printer reboot, recall it with one command — verified working after a full Zebra power cut (Sept 2026).
Save the label to flash (one time)
That file starts with ^DFE:CCSBLACK.ZPL. E: = flash memory, survives power-off. R: = RAM, wiped on reboot — never store to R.
Restore / recall (after any power cycle, or anytime)
Starts with ^XFE:CCSBLACK.ZPL — recalls the stored label and prints it. If the printer has been fully powered off, just run this again and confirm a clean label prints.
^XFE:NAME.ZPL, not ^XFE,NAME) · E: flash survives reboot, R: RAM does not · filenames max 8 characters · the bagger screen's own "store to label 999" writes volatile memory and will be gone after a reboot — ignore it.
Manufacturer documentation: Printer manual (Ti-1000Z family) — “Stored Labels” section, p. 22 (recall by Label # 001–999, Clear Labels, label Length isn't saved with a download — set it per label). Step-by-step APPI Help Docs with screenshots: HT000011 — Load Stored Labels (bagger screen) · HT000155 — Store labels from a PC (.ZPL send) · HT000154 — Print labels (daily flow). The bagger manual (v8a/v9 §3.31, §3.42) says it outright: bagger settings save on the PLC/USB — labels live in the printer and are managed from a PC with printer software.
Training
Operator certification checklist
Operators must demonstrate proficiency in each skill below before being certified to run the T-1000 bagger independently. The certifier initials and dates each line item.
Core machine operations
| # | Skill | Date | Certifier initials |
|---|---|---|---|
| 1 | Identify all controls on the panel: power, start, E-stop, cycle mode, seal temp, pressure gauge, counter | ||
| 2 | Perform full startup sequence: inspect machine, power on, check disengage lever is closed, seal temp 380 °F / 0.3 sec, inspect film, drain air catch, close ball valve, connect air hose, start compressor, open ball valve, set 50 PSI, test cycle | ||
| 3 | Perform full shutdown: complete pending cycle, shut off compressor and empty the valve, power off, drain compressor tank, clean sealer bar | ||
| 4 | Emergency stop: demonstrate proper E-stop usage and twist-to-release restart | ||
| 5 | Change film roll: remove empty core, load new roll from storage area, thread film through rollers per diagram | ||
| 6 | Verify bag fit: run a test bag and confirm the bag length and fit match the product before production | ||
| 7 | Adjust seal temperature: set to 380 °F / 0.3 sec dwell for standard poly, run test seal, inspect for melt-through or weak seal | ||
| 8 | Switch cycle modes: toggle between Manual, Semi-auto, and Auto — explain when each is used |
Label & printer operations
| # | Skill | Date | Certifier initials |
|---|---|---|---|
| 9 | Print a label: run print_label.py from the Mac workstation with correct .docx file | ||
| 10 | Fix upside-down label: add --rotate 180 flag and re-print | ||
| 11 | Adjust label position on bag: modify left_margin or top_margin in print_label.py to shift label placement | ||
| 12 | Change label ribbon (Zebra printer): open printer, replace ribbon roll, close and feed | ||
| 13 | Clear printer jam: safely remove jammed label/media from Zebra printer, verify feed path | ||
| 14 | Check printer queue and status: run lpq -P Zebra and lpstat -p Zebra | ||
| 15 | Cancel a stuck print job: run cancel -a Zebra and cupsenable Zebra |
Troubleshooting & quality
| # | Skill | Date | Certifier initials |
|---|---|---|---|
| 16 | Identify and respond to low air pressure: check regulator, drain compressor, inspect hose for leaks | ||
| 17 | Troubleshoot poor seal quality: check temp setting, inspect sealer bar for residue, verify air pressure | ||
| 18 | Clear a bag jam in the T-1000: safely open film guard, clear jammed film, reset machine, test cycle | ||
| 19 | Rebag a product: remove damaged bag, inspect product, print new label if needed, re-bag and seal, log in REWORK-001 | ||
| 20 | Recover from printer "not ready" error: power-cycle the Zebra printer, resend last ZPL job | ||
| 21 | Perform daily operator checks: drain compressor, verify pressure, inspect air hose, check water separator |
Operator name: _________________________________
Date certified: ________________
Certifier name: _________________________________
Recertification due: ______________
Quality
Rebagging procedure
When a product needs to be removed from its original bag and placed into a new one due to damage, incorrect labeling, or QC failure.
Film roll loading reference
The manufacturer's own tutorial for loading and threading a roll of bags onto a T-1000 lives on Vimeo (Advanced Poly-Packaging's channel), but it is set to play only on advancedpoly.com — the embed shows “Sorry” everywhere else, so it can't be placed on this page.
How to thread a roll of bags onto a T-1000 with ZT printer → (opens on Vimeo; may show a domain restriction message there too)
Our own rebagging video is embedded at the top of this section. Written changeover steps live in Change bag & film roll.
When to re-bag
| Situation | Action |
|---|---|
| Bag torn or punctured during handling | Re-bag with the same label on a fresh bag |
| Label printed crooked or off-center | Re-bag with a corrected label print |
| Seal failed (bag not closed) | Re-bag; inspect sealer bar for residue or damage |
| Wrong product in bag | Re-bag with correct product and label |
| QC inspection failure | Repair/rework per NCR, then re-bag with original label if product passes |
| Film roll change caused misaligned print | Re-bag any products bagged during the transition |
Step-by-step re-bagging
- Inspect the product — ensure it isn't damaged and still meets QC criteria
- Remove old bag — cut or tear open the original bag; discard it
- Verify the label — confirm the existing label is correct and legible, or print a new one
- Place product in new bag — align the product so the label faces outward and is readable
- Position the label — ensure the barcode is not wrinkled, folded, or obscured
- Seal the bag — run through the T-1000 sealer or use a hand sealer if doing a single bag
- Verify the seal — tug test on both ends of the seal; no gaps
- QC check — confirm the barcode scans, label is upright, bag is clean
Label reuse rules
- If the original label is undamaged and still adhered, it can be reused on the new bag
- If the label lifted or is creased, print a fresh label using
print_label.py - Never hand-write a replacement barcode — always print from the .docx source
- Re-bagged items must be logged in the rework log (form REWORK-001)
Support
Troubleshooting: label placement & orientation
Label position on the bag can vary due to printer calibration, media alignment, padding values, or orientation. Use this guide to isolate and correct placement issues.
Placement variance: root causes & fixes
| Symptom | Root cause | Fix |
|---|---|---|
| Label shifted too far left | left_margin too low |
Increase left_margin (default 60) in generate_zpl() — try 80–120 |
| Label shifted too far right | left_margin too high or ^FO X too large |
Decrease left_margin (try 40–20) or reduce side_padding |
| Label too high (near top of bag) | top_margin too low |
Increase top_margin (default 30) — try 50–80 |
| Label too low (near bottom of bag) | top_margin too high or bottom_padding too low |
Decrease top_margin (try 10–20) or increase bottom_padding |
| Label prints upside down on bag | Image not rotated 180° | Add --rotate 180 to the script, or rotate the image in Python before ZPL generation |
| Label prints mirrored / reversed | Wrong bit ordering in ^GFA |
Use byte_val = (byte_val << 1) | bit with bit = 0 if px else 1. First pixel = MSB = leftmost dot. Do not reverse bits. |
| Bottom of label cut off | bottom_padding too low |
Increase bottom_padding (default 80) — try 120–160 |
| Sides of label cut off | side_padding too low |
Increase side_padding (default 120) — try 160–200 |
| Label prints too large for bag | Scale factor too large | Reduce --scale from 4 to 3 (2.85" width) |
| Label prints too small to read | Scale factor too small | Increase --scale from 4 to 5 (4.75" width) |
| Printer shows "not ready" / rejects job | Bad ZPL with ^PON/^FWN |
Remove those commands. Reboot printer (power cycle). CUPS re-enable won't fix it. |
| Garbled / unreadable printout | Wrong bit ordering or missing -o raw |
Check bit ordering in ^GFA. Confirm you're sending with -o raw (or use print_label.py). |
Padding values reference
All adjustments are in dots at 203 DPI. Modify these in print_label.py (inside generate_zpl()):
| Parameter | Default | Effect |
|---|---|---|
left_margin | 60 | Shifts label left/right |
top_margin | 30 | Shifts label up/down |
bottom_padding | 80 | Extra space below image (prevents clipping) |
side_padding | 120 | Total side padding (prevents side clipping) |
Mac-specific orientation setup
On macOS, the printer driver and CUPS filters can interfere with raw ZPL passthrough. This setup ensures correct orientation:
- Create the print queue with
lpadminas shown above — use the raw USB URI, do not install a macOS printer driver - Always send ZPL with
-o rawto bypass macOS rasterization - If the label orientation is wrong, fix it in Python with
--rotate 180— never use ZPL orientation commands - The
print_label.pyscript handles all of this automatically: raw queue, correct bit ordering, rotation in Python
Support
Seal troubleshooting
Poor or failed seals are usually caused by temperature, air pressure, film tension, or a dirty sealing bar. Use this guide to isolate and fix seal defects quickly.
Seal defect: root causes & fixes
| Symptom | Root cause | Fix |
|---|---|---|
| Machine stalls mid-cycle / jaw motion is weak or slow | Air supply starved (compressor behind or drain clogged) | Check the T-1000 gauge first: below 50 PSI, drain the compressor tank (see Compressor setup for the clogged-drain blowout recovery), reopen the ball valve, re-verify 50 PSI |
| Pressure dropped slowly during the run | Leaking hose or quick-disconnect, or compressor tripped/off | Listen for hiss along the hose and fittings; re-seat the quick-disconnect; confirm the compressor is running and the ball valve is fully open |
| Seals got weak and machine sounds "wet" | Water in the air line (full air catch / separator) | Drain the air catch / water separator bowl, then the compressor tank; run 2–3 test bags to purge wet air before resuming production |
| Weak seal that peels open easily | Seal temperature too low | Increase seal temp dial in small increments; run test seals until the film fuses |
| Seal melted through / holes in film | Seal temperature too high | Decrease seal temp dial; check the film roll label for the recommended temperature |
| Incomplete seal (partial closure) | Low air pressure | Verify 50 PSI on the gauge; drain compressor, check hose and ball valve |
| Seal skips or is uneven along the bar | Residue or film contamination on sealing bar | Stop machine, clean sealing bar with lint-free cloth once cool |
| Seal not centered / crooked | Film threaded unevenly | Re-thread film per diagram, keep tension even and avoid wrinkles |
| Film sticks to sealing bar | Bar too hot or coated with residue | Lower temp, clean bar; consider non-stick coating if recurring |
| Seal quality varies between bags | Compressor cycling / pressure fluctuation | Verify regulator holds 50 PSI; check for leaks in hose line |
| Bag won't release from bar | Overheated or dirty bar | Cool down, clean bar, reduce seal temperature |
Seal quality check
Before production and after any temperature, pressure, or film change, verify seals with a tug test: grip both sides of the sealed edge and pull firmly. The seal must hold with no separation or pinholes.
Seal temperature reference
Standard setting used on this machine: 380 °F with a 0.3 second seal dwell time.
| Film type | Typical seal temp |
|---|---|
| Standard LDPE poly (default) | 380 °F · 0.3 sec |
| Thin film / lightweight | Lower than 380 °F |
| Heavy gauge / thick | Higher than 380 °F |
Is the temperature right — or masking something else?
Our baseline is 380 °F / 0.3 sec, which sits in the manual's normal 360–440 °F band. But temperature is the dial everyone reaches for last-resort — and the manual's own troubleshooting table lists “seal temperature too high” as the cause of sticking bags, melt-through, and film damage. If bags tear at or next to the seal, or stick to the bar and get yanked, suspect the temp is high.
Find your real number with a ladder test (one variable, small steps):
- Start at the current setting and run 3 test bags; do the tug test on each seal
- Drop temp by 10–15 °F, wait for the heater to settle, run 3 more, tug test again
- Keep stepping down until seals start failing the tug test (peels open, gaps, pinholes)
- Set the machine 10–20 °F above that failure point. That's your film's real number — not 380 out of habit
- If seals go weak well above where they used to pass, the problem isn't temp — it's pressure, bar cleanliness, or the rubber strip (below)
If temp seems to need to be high, check what it's compensating for — in order:
- Air pressure below 50 PSI at the machine (weak, partial seals; our compressor water/drain issues live here)
- Seal time too short for the film thickness (manual @400 °F: 0.3 s for 1.5 mil, 0.4 s for 2–3 mil, 0.7 s for 4 mil — time and temp trade against each other)
- Dirty sealing bar / contaminated rubber strip on the pressure bar (clean with alcohol once cool)
- Worn PTFE sheet (folded over, scored, at end of roll — bag sticks, seals go inconsistent)
- Temperature drifting out of range (lots of Waiting pauses: thermocouple or heater cartridge on the way out — raising the setpoint hides it, badly)
Waiting pauses & measuring real drift
The manual does not publish the temperature tolerance — the band is set in the PLC program. What it does say: the machine shows Waiting (flashing) and pauses operation whenever the bar is out of range, and in Auto + Start an idle machine will pause and resume all by itself as temp drifts — every resume is a cycle (nip engagement, audible clunk). So temperature drift and “random activations” can be the same event.
Measure the real offset (Tech Assist, passcode 1001 by default): Main Menu → Technical Assistance → Bagger Factory → Temp Calib (yellow button, right side). The screen shows the bar's current reading; compare it to a known-good external probe on the bar and enter the variance in the Adjustment field so the Read Out reflects reality.
Check TempRange on the same screen — this is the answer to “how far out of range before the machine Waits”: the acceptable band is setpoint ± TempRange (360°F + range 20° = Ready anywhere in 350–370°; outside → Waiting). Manual's suggested setting is 20°. If yours is much wider, someone widened it to silence Waiting while the real fault (thermocouple/cartridge) grew — restore 20° and fix the part. If it's much narrower, an aging heater Waits constantly. Note the current value before changing anything.
Also in Bagger Factory, two settings that matter for the 24/7 habit: Heat Off (minutes of inactivity before the heater bar auto-turns-off — set ~20–30 so an idling machine stops heating overnight) and Blower OFF (air-knife auto-off, typical 3–5 min).
PLC IO Status (same Tech Assist menu) shows two counters that can't be reset: Hours (total powered-on time — proof of the 24/7 habit) and Cycles (total cycles — the maintenance charts are per 1M cycles, so log it). Every other Tech Assist item (APPI Factory, Scale Factory, Option Passcode, License Status) is factory/tech territory — look, don't touch.
Next time Waiting flashes: write down the displayed temperature. If it sits 10–20°F under setpoint for a long stretch, that's an undershooting heater (cartridge aging), not normal regulation.
Support
Premature bag breaks & web tension
Bags tearing at the perforation or edges during indexing — often with an audible clunk from the roller area — is a web tension problem, not a seal setting. Work the checklist in order; change one thing at a time and test after each change.
What's actually happening
The two rollers past the load table that press together are the drive (nip) roller pair: one is motor-driven (the “active” roller timed to the machine), the other is its partner that clamps against it to grip the film. That engagement is normal — every index pulls the web through them.
The bag roll itself sits on a shaft wrapped by a brake strap under the dancer bar. That strap is the machine's only tension control. If it grips instead of slipping smoothly, the nip rollers pull against web that can't pay out, and the bag tears. The manual's rule: if the web of bags breaks prematurely, the tension is too high.
The “it frees up after sitting” behavior is stick-slip: a dirty, glazed, or over-tightened strap grabs with a click when it re-engages, then releases after standing. It's a friction state, not a machine mode — no setting engages the rollers together.
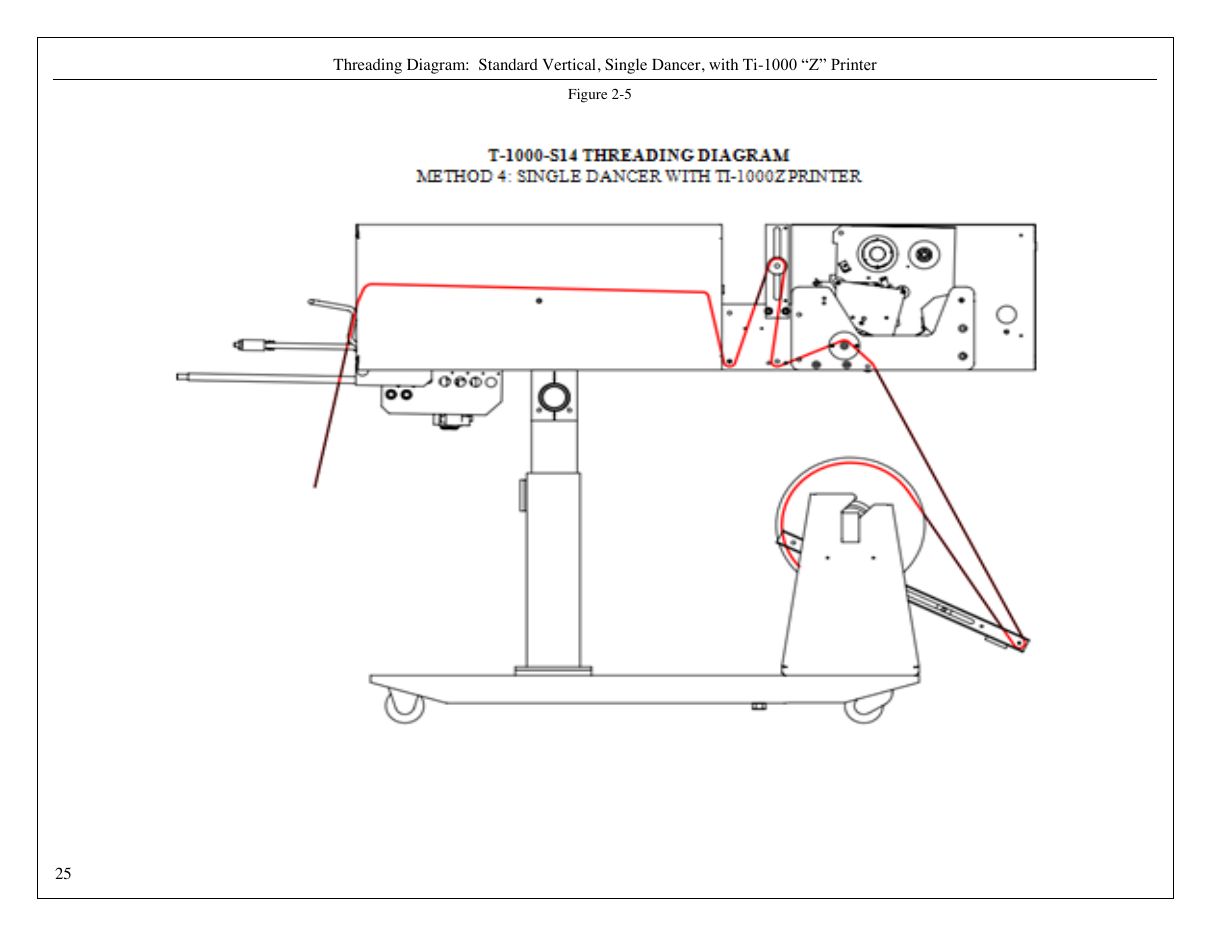
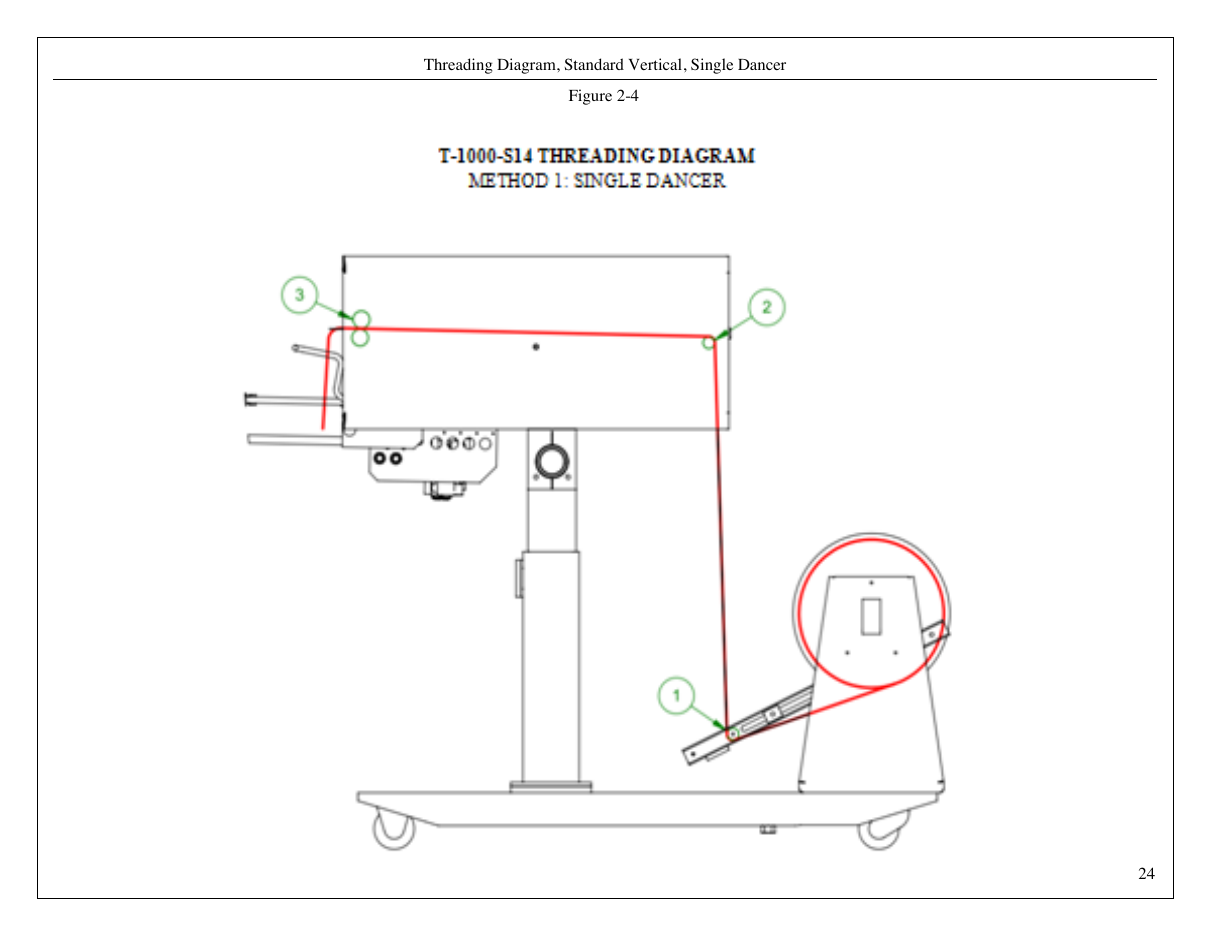
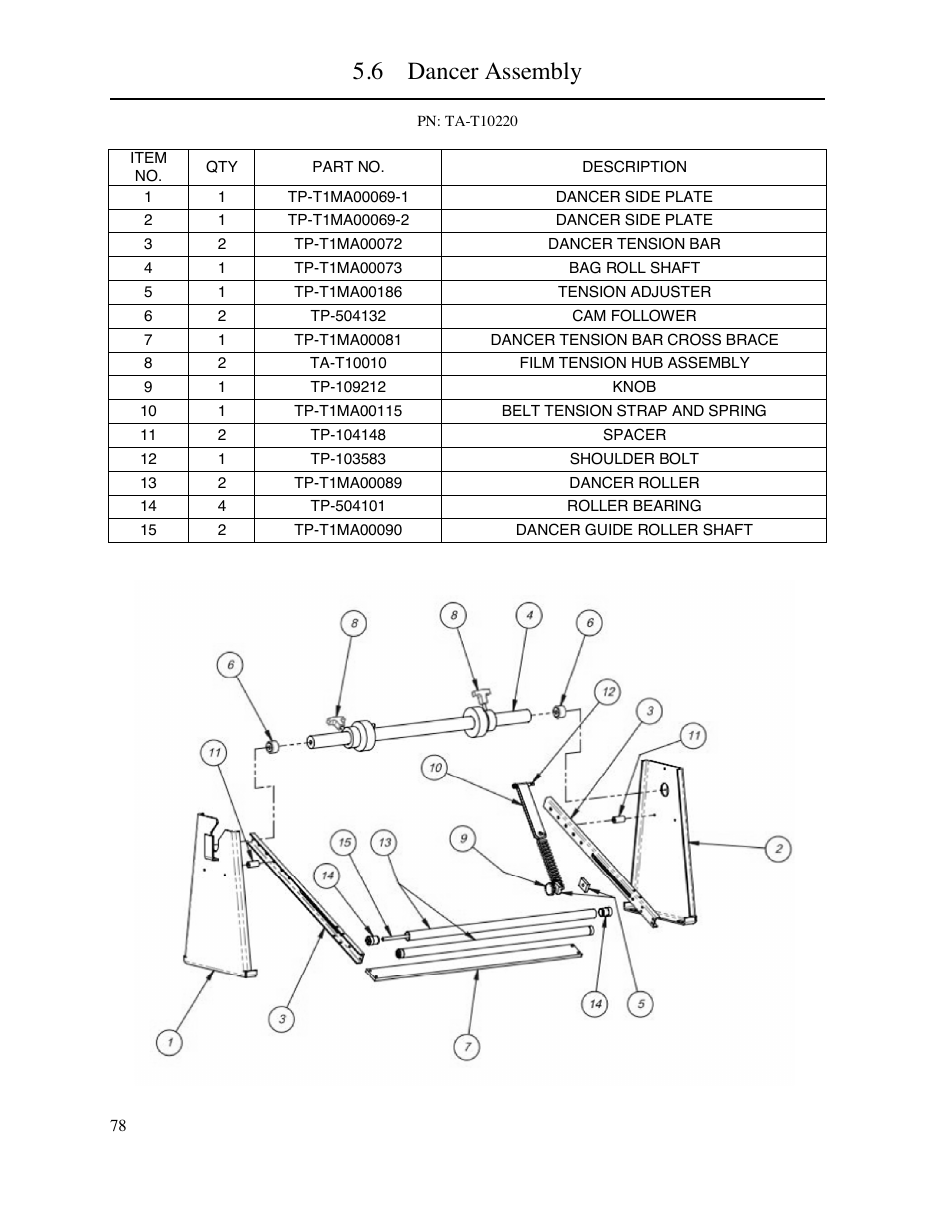
The nip rollers (“active/passive” pair): cleaning, alignment & compression
The two rollers past the load table are the nip rollers (not related to the air compressor): one rubber-covered grooved roll (the driven, “active” one) and one grooved steel roll that presses into it. The pressing force is the compression — it's how hard the pair grips the web. The manual's trade-off: too little compression and bags won't tear off after sealing (they slip); too much and you wear the drive roll and motor — and the grip fights the dancer brake, which is what rips film.
Cleaning comes before any of this. Wipe both nip rollers with alcohol on a cotton cloth (power off) — dirt makes them slip (bags stop tearing off), glaze/residue makes them grab (tearing + that audible clunk). The manual is explicit: always clean rollers before adjusting — a dirty roller reads as a miscalibrated one.
Adjustment is two jobs in one: make the rollers parallel, then set the compression. Both are done from the two side panels:
- Power off, unplug, remove the left and right side covers
- Clean both rollers with alcohol first
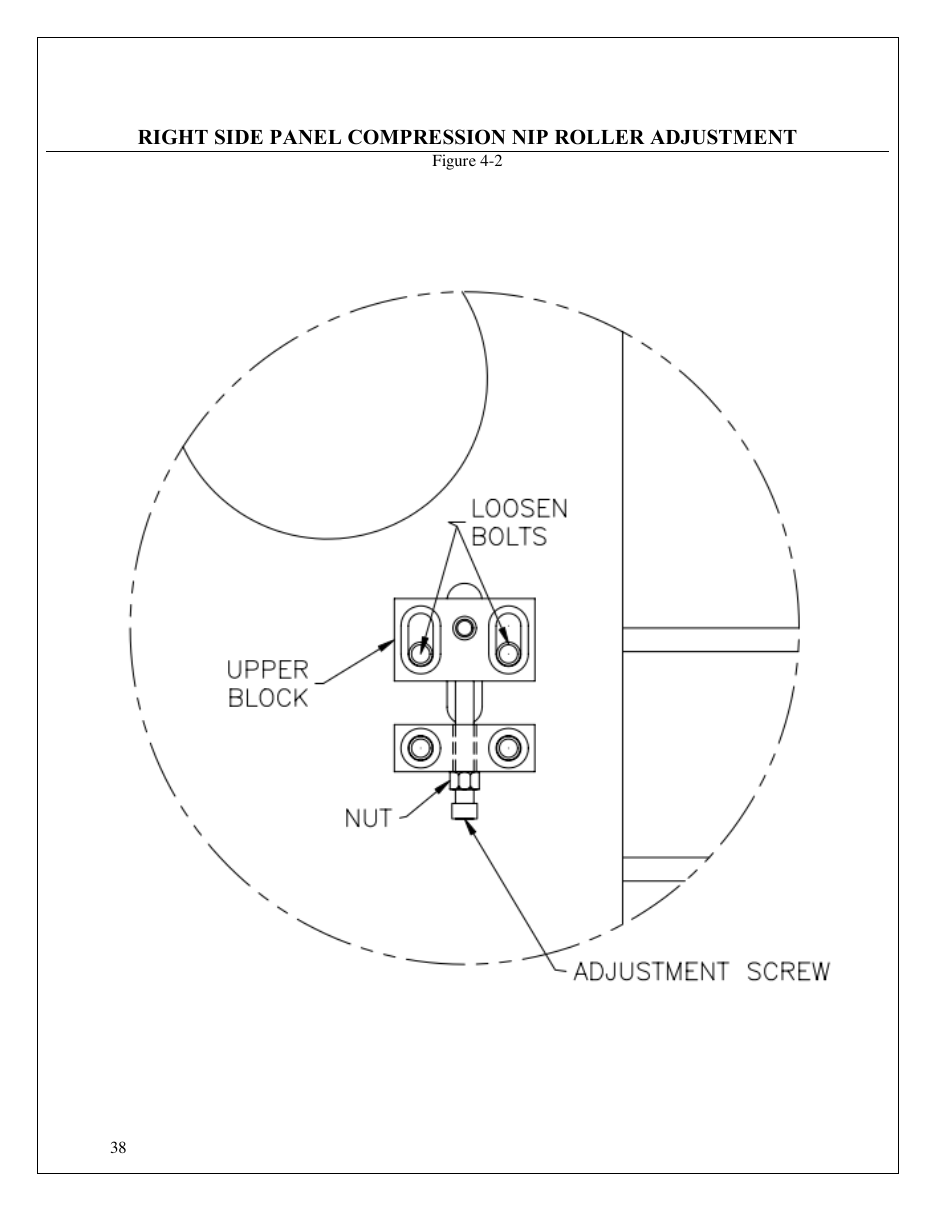
- On each side panel, loosen the two locking bolts on the upper block of the compression assembly, then loosen the nut on the adjustment screw (see figure below)
- With the inner frame locked UP, turn the adjustment screws counterclockwise to lower the bottom roller until it's parallel to the top roller with a 1/16" gap — put a lamp behind the rollers so you can see light through the gap and judge parallelism
- Turn the screws clockwise, alternating left screw / right screw, keeping the roller parallel, until the rollers just touch across the full width
- Drop the inner frame down and raise it again — both ends must touch simultaneously. If not, redo from the parallel step
- Snug the upper block bolts and recheck; don't gorilla-tighten
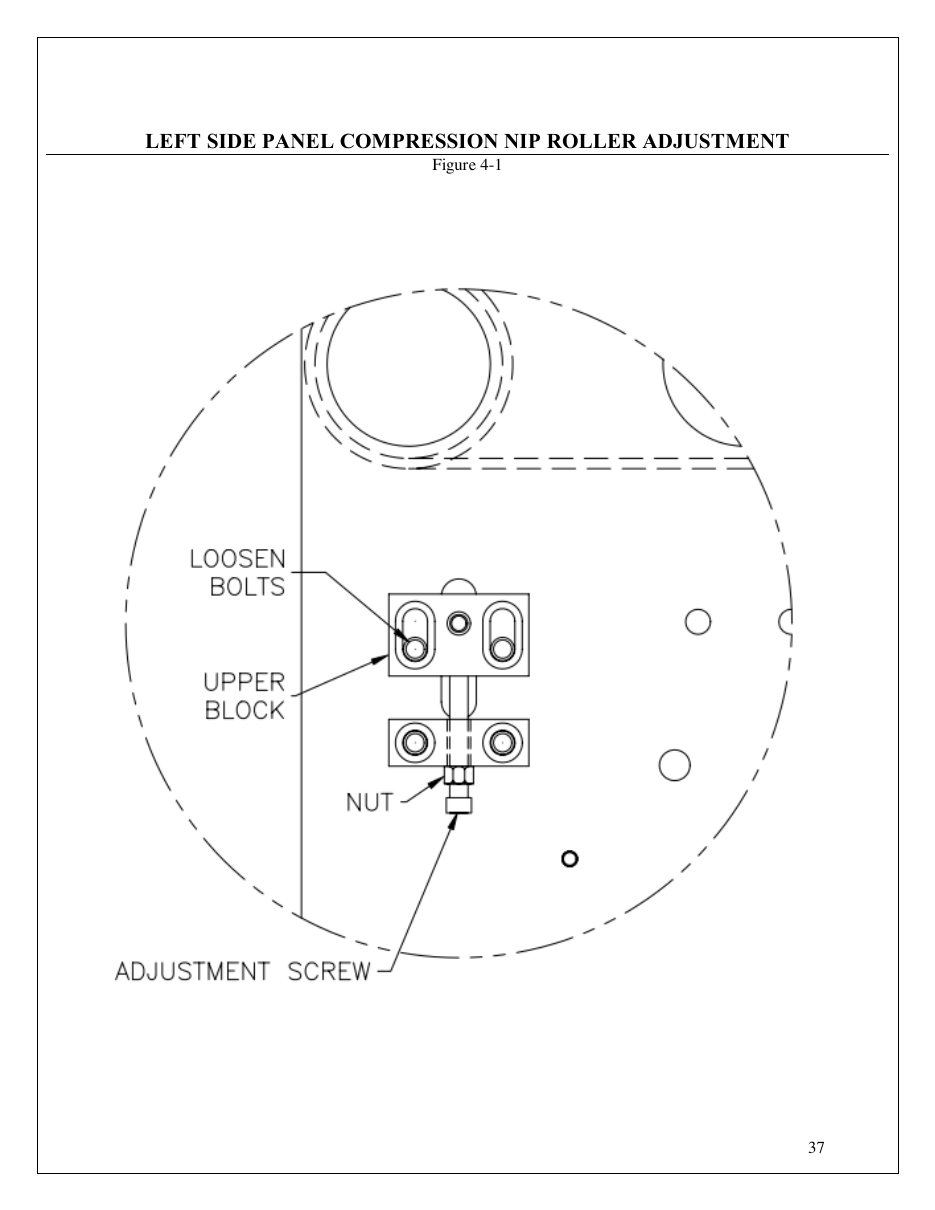
Fix order — one change at a time
Run a test cycle after each step. If a change makes it worse, put it back (manual's rule) and move to the next step:
References & manual links
| Source | What it covers |
|---|---|
| T-1000-S14 Operations Manual v8a (official PDF) | Sections 4.4–4.6 (dancer, brake strap, web guides), 4.19 (spare parts kits), 4.20–4.21 (troubleshooting guide & checklist) |
| T-1000-S14 Operations Manual v9 (official PDF) | Same content, newer serial range (214101247 and up) — use whichever matches your machine's serial |
| ManualsLib browsable copy | Same T-1000-S14 manual in a page-by-page web viewer (no download) |
| Diagrams on this page | Reproduced from the APPI T-1000-S14 operations manuals for internal training: threading Method 4 (with ZT printer — our config) and Method 1 (no printer), dancer assembly exploded view, and nip roller adjustment Figs. 4-1 / 4-2 (Sec. 4.3) |
| Advanced Poly-Packaging (APPI) | Manufacturer — (330) 785-4000 / (800) 754-4403 for the pass-coded options and factory support |
No public video exists for the dancer/brake adjustment — the vendor's only operator video (threading, on Vimeo) is domain-locked to advancedpoly.com. Our own threading video is in the Rebagging section; a short clip of the strap adjustment belongs here when we film it.
Maintenance
Replacement parts & intervals
Wear items with direct purchase links to APPI's parts store, and replacement intervals. Interval labels: (manual) = documented in the T-1000 operations manual; (shop rec) = our recommendation based on one daily shift — the manual is condition-based for most of these, so treat shop intervals as ordering triggers, not hard rules.
Wear parts — keep these on the shelf
| Part | Part number | Replace when | Recommended interval |
|---|---|---|---|
| Brake tension strap (dancer) — the tension strap that grabs the roll shaft; the #1 suspect in our bag-tearing saga | TP-T1MA00115 → | Glazed, shiny, or grabby — audible clunk when it re-engages, tears after idle (manual: condition-based) | (shop rec) Inspect monthly; replace ~annually under daily use; keep 1 on shelf |
| Heater cartridge (800W, 110V S-14) — inside the heater bar; aging = undershooting temp, longer Waiting | TP-217116 → | Temperature won't hold setpoint; long undershoot stretches (manual §4.13: normal wear item) | (shop rec) Check via Temp Calib monthly; keep 1 on shelf; replace on condition or ~yearly heavy use |
| Thermocouple wire — reads bar temp; failing = wild fluctuations, wrong reading, Waiting storms | TP-221416 → | “Excessive fluctuations or incorrect temperature displayed” (manual §4.14, verbatim trigger) | (shop rec) Keep 2 on shelf; replace on condition — it's a $part, swap before chasing setpoints |
| PTFE anti-stick sheet — bag slides over it during sealing | TP-300500 → | Scored, holed, or worn through — rotate the rolls to fresh surfaces first (manual §4.6–4.8); bags sticking = inspect | (manual) Inspect weekly, rotate before replace · (shop rec) keep 1 on shelf, expect ~1–3 months of daily use per sheet |
| Rubber sealing strip (pressure bar) — the rubber the hot bar presses through | TP-306002 → | Brittle, torn, gouged, or contaminated (manual §4.11); dirty = alcohol-clean first, replace if damaged | (manual) Clean daily, inspect monthly · (shop rec) keep 1 on shelf |
| Compression springs (pressure bar, qty 2) — anti-jam + clamping force | TP-108155 → | Broken/settled springs; pressure bar assembly service (manual scheduled chart: every ~2M cycles) | (manual) Inspect at pressure-bar service · (shop rec) keep 1 pair on shelf |
| Micron filter (4µ, air knife) — keeps the bag-opening air clean | TP-406181 → | Contaminated / restricted (manual PM chart: inspect monthly) | (manual) Inspect monthly, replace as needed · (shop rec) quarterly swap, keep 1 on shelf |
| PTFE-coated bushings (3/8", qty 4) | TP-107160 → | Worn during roller/frame service; replace at rebuild (in both spare-parts kits) | (shop rec) Keep a set on shelf for the next roller service |
| PLC backup battery (3V coin, FP Sigma PLC) — keeps settings through power-off; a dead one = "settings lost when machine is off" | TP-214111 → | Settings evaporate when powered off — swap with machine powered ON so memory holds (generic: Panasonic AFPG804) | (shop rec) ~every 3–5 years; replace immediately if settings don't survive a power cycle |
| Fuse (12A time-delay 3AG) | TP-207344 → | Blown (main power / screen dead) | (shop rec) Keep 2 in the drawer; if it blows twice, find the cause |
Daily / weekly / monthly maintenance rhythm
From the manual's Preventative Maintenance Checklist (§4.16), matched to who does it:
| When | Task |
|---|---|
| Daily (operator) | Drain filter/regulator water · verify 50 PSI · check anti-jam · alcohol-clean pressure bar rubber |
| Weekly (operator) | Clean perf sensor · clean upper rubber roller + inspect for nicks/cuts · clean lower aluminum roller · inspect PTFE sheet |
| Monthly (maintenance) | Micron filter inspect · wiring/connector check · air lines/valves leak check · blow out compartments · oil side-plates · drive belt inspect · Temp Calib reading logged (drift trend) |
| ~2M cycles (manual chart) | Pressure bar disassembly, spring inspection, perf sensor/spring inspection (each chart number = 1M machine cycles) |
Compressor consumables (drain valve/petcock) are the compressor maker's parts, not APPI's — see the Compressor setup section.
Settings lost on power-off — PLC battery, and why the machine shouldn't run 24/7
If settings “evaporate” when the machine is powered off, the PLC's backup battery is dead — the manual is explicit that changed settings save immediately and survive power loss (§3.41). The battery is a 3V lithium coin cell for the Panasonic FP Sigma PLC: APPI part TP-214111 → (generic: Panasonic AFPG804; also in the Level 2 spare parts kit). It's a ~$10–30 coin cell with a multi-year design life — if it's original to the machine, it's overdue.
Recommended fix order:
- Job Save first — before any battery work: Main Menu → Job Save writes current settings to a saved job slot (manual §3.41), so the recipe can be recalled even if volatile memory clears
- USB external memory (the built-in solution) — the machine natively supports USB recipe storage. Use a small name-brand drive, 8–32GB, formatted FAT32 with an MBR partition table (old embedded USB hosts are picky; large or exotic drives often fail). On a Mac: Disk Utility → Erase → MS-DOS (FAT); for >32GB drives use
diskutil eraseVolume FAT32 THRIL MBRFormat /dev/diskN. Leave the stick empty — the machine creates its own structure (aDAT0000/folder tree plusREC0000.CSV). Then: unscrew the back cover of the touch-screen housing, insert the drive into the port on the bottom-left of the screen unit, go Main Menu → Tech Assist (passcode 1001) → Bagger Factory → Bag Registration (right side) → PLC / USB toggle at the bottom of that screen — switch it to USB (manual §3.40–3.42; on older software the toggle sits inside Perf Registration instead). Then Job Save as usual. The stick stays with the machine: never reformat or reuse it elsewhere
USB-mode gotchas (verified on our machine): the on-device Recipe List screen shows nothing in USB mode — that's normal; the recipe record (REC0000.CSV) is only readable on a PC. Job Search has no browse list in USB mode: you must type the exact job name on the keypad and press Enter/Search, then Load. First boot after power-off will ask you to load a job — that's expected; type the name and load it - Replace the PLC battery — different location: it's on the PLC inside the electrical cabinet, not behind the touchscreen housing. Do the USB setup first; with jobs saved to the stick the swap loses all risk. Swap with the machine powered ON (the PLC's power supply holds memory during the swap; the battery only matters when power is off): pull the old coin cell, click in the new one (TP-214111 / Panasonic AFPG804), then power-cycle once and confirm settings survived
- Return to normal power-off at end of day — with battery + saved jobs (and optionally USB memory), shutdown should no longer lose settings. Running 24/7 was masking a dead battery; it also wastes energy, adds heater-hours, and lets Auto+Start cycle empty bags all night (see the phantom activation note)
REC0000.CSV row). The label formats live in the printer's own memory (Ti-1000Z hang-behind printer, slots Label # 001–999, recalled by number from the printer Setup/Stored Labels screen — note which number each SKU uses and write it here: ____________). Printer memory survives power-off; the printer even has its own rear power switch so it can be reset without touching the PLC. The label source files (.docx / .zpl) live on the Mac in poly-bagger/UPC Labels/ and are committed to this repo — any stored label can be regenerated from them if ever needed. The boot-time “load a label” prompt is a selection (which stored label number to use), not a loss. Known quirk: label lengths aren't saved with stored formats — keep a small chart of label length per Label # (manual recommends stored labels share one length, or set Length manually on recall).
Quick reference
Section QR codes — downloadable & printable
Every section has its own QR code so an operator can jump straight to the right part of this guide from their phone. Download each QR as a PNG to post at the machine, or print all of them at once on a single sheet.
Operator menu — mobile workflow
Print this card and post it at the bagger station. Scan it to open the phone-friendly menu.
Full guide — on your phone
Scan this QR code to open the complete guide on your mobile device. Post this at the bagger station.